Multi Purpose Wall Decor Hanger
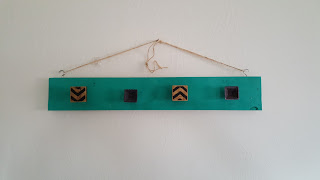
 I love these wall hangers. They are super simple to make and you can hang almost anything on them.
Mine were all made with leftover pieces of wood and hardware I've found in clearance bins. On top of costing next to nothing in materials, these only take about 30 minutes of actual work time (dry time for paint not included).
I am serious about the organization in my home. With kids and dogs and constant chaos, I. Have. To. Be. I have a rule that everything we buy or have has to have a place to "live". Meaning everything has to have a place to be put away when we're not using it or a place to stay permanently that isn't in the way. My family does a lot of home projects, crafting, and creating. And I hate when horizontal spaces (like counters and tables) become platforms for clutter. So I always run through this internal shopping monologue before buying something: "where will I put this until I need it, do I have room to store this, how badly do we need it?"
My need for organization also contributes to a lot of my DIY projects. In the case of these hangers, I needed a place to hang my long necklaces. I rarely get to wear jewelry, mostly because my youngest likes to rip it from my body like he's trying to save me from a poisonous snake that has wrapped itself around my throat. So for those long stretches of months between wears, I needed a place away from sticky hands to keep them safe, and this worked perfectly!
My Process:
First I rummaged our scrap wood to find something that was big enough but not so big that I would have to cut it. Because I just didn't want to commit to that level of creating that day. Luckily I found a perfect piece of crown moulding from an earlier project for my jewelry, and just an old 1X4 for my second hanger. If you're not a big DIYer, or you just don't have scrap wood on hand, pick up any cheap plank of wood. It doesn't need to be fancy or expensive.
Next I slapped on some paint. Spray paint is my most favorite thing. It's quick drying, fast and simple, plus easy storage. I spray paint everything I can! It is such a simple way to add color or to just update an old item. In the spring there is a patch of grass on the side of my house that is just a rainbow of color from me spray painting old pots for my garden. I am not at all brand loyal when it comes to spray paint. I am all about that color! If the color is good and it works on multiple materials, I'll buy it.
After your paint dries, it's time to mark off where you want the knobs. This doesn't need to be super exact. I eyeballed mine. But if you need it be perfect, by all means measure it. You do you. For me it just wasn't super important.
Once your happy with placement, drill the holes. Make sure you're using the right size drill bit. If you're not sure on size, it's always safer to start with a smaller size and go up from there. I also attached some way to hang it on the wall. With the one for my jewelry, I screwed picture hangers in the back. With my second one I used screw hooks on the top. I tend to use whatever I have on hand. Judge your space and what you will be hanging. You might need something stronger or specific to your type of wall.
 Screw your knobs in place and hang it on the wall. Put whatever you want on there! The one I made for my jewelry is hanging on my bedroom wall with command hooks. We've only been in our house for a year and I haven't started renovating this area of the house, so I'm not really committed to placement here. Command hooks are amazing for this kind of stuff though. I can hang it and then move it later without putting holes in the wall.
This is a great weekend project if you only have a little bit of time but you're spring cleaning and trying to get organized. I am sure that I will find more uses and variations as the need arises.
Have you made something like this? Leave your comments and suggestions!


Comments
Post a Comment