DIY Garden Bird Bath
 This is one of my favorite projects that my daughter and I have made this year. As I have said in earlier posts, my daughter loves gardening. She also loves birds. Recently we made a bird feeder out of an old pickle jar, but Quinn wanted to do more for the birds in our yard. So we decided to make a bird bath.
Things you'll need:
Plastic bowl
PVC pipe (size depends on desired height of bath)
Spray paint
Decorative pebbles
Industrial, waterproof glue
JB Weld
Seashells (optional for decoration)
 First I took an old piece of PVC pipe that we had laying around in the garage and I used JB Weld to glue it to a plastic bowl. I just used a cheap plastic bowl that I found for 50 cents. It doesn't need to be fancy, just sturdy. And it needs to fit on top of your PVC pipe.
Next I glued shells around the bottom of the bowl where it connected to the PVC pipe. This helped cover the not so pleasing glue mess I made, and also made the whole bird bath look a little more decorative.
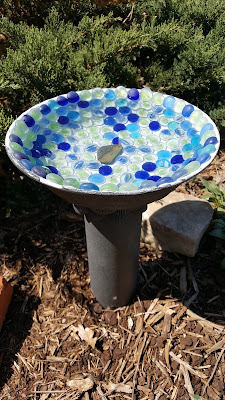
After it was all put together, I spray painted the entire thing minus the inside of the bowl. I left the inside of the bowl untouched mostly because at that point, I hadn't quite figured out how I wanted to attach the decorative pebbles on the inside of the bowl.
I used a spray paint that created a stone effect and texture, which gave my final product a more authentic bird bath feel and look that I really like. I didn't prime the PVC pipe before painting. Honestly I think it would have been better if I did, but I was out of primer and I didn't really want to go back to the store that day. Even without the primer, it's hard to tell that it is made out of plastic pipe and a 50 cent bowl.

The inside of the bowl was the hardest part of this project. I had to work in sections which made it
take a lot longer than I anticipated it would. I used a waterproof industrial glue to create a mosaic design inside the bowl with the glass pebbles. this worked really well, it just took some patience and time. I considered grouting the pebbles in instead, but I was concerned that the inside of the bowl would not grout well and using glue just seemed easier. I spent a couple of days on the inside gluing pebbles and then waiting for them to dry, then repeating the process. I bought one small bag of pebbles and ended up about 4 pebbles short of filling in the entire inside. I probably would have had enough, but my daughter squirreled away some pebbles for later use, as is her usual behavior. So I just put a nice rock in the gap. I figured the birds wouldn't really mind if the rocks weren't all the same, and I wasn't going back to the store to buy a whole new bag for 4 pebbles.
 After the gluing and drying, I was ready to put this in the garden and get some water in it! I buried the PVC a few inches in the ground and made sure to pack the dirt around it so that it would stay straight. Poured in a little water and finished!
I am really pleased with how this all came together. I went into this project with very little in the way of a plan and just kind of made it up as I went along for most of it. But it turned out great and it's a great addition to my garden. I hope the birds enjoy it as much as I enjoyed making it.
Let me know in the comments if you have some suggestions, or if you made something like this with your own style or creative flair.


Comments
Post a Comment